
Most centrifugal and surface pumps must be primed before every start. Submersible pumps generally do not need manual priming once submerged, but re-priming may be required after long shutdowns or low water levels. Solar and fuel-driven pumps have unique priming nuances tied to low-voltage startup and engine vacuum assist. This guide covers all four categories in depth.
What Is Water Pump Priming? (Definition + Why It Matters)

The Physics in Plain English
Priming a water pump means filling the pump casing and suction pipe with water (or the pumped fluid) and venting all trapped air before startup. This process ensures the impeller operates within a liquid medium rather than spinning against air.
Centrifugal pumps operate on the principle of impeller centrifugal force. As the impeller rotates, it creates a low-pressure zone at the “eye” (suction side) and a high-pressure zone at the discharge. If the casing is filled with air, the impeller cannot generate this pressure differential. Instead, you encounter:
- Air Lock: Zero fluid movement despite the motor running.
- Cavitation: Vapor bubbles form and violently collapse inside the casing, pitting the impeller and destroying the mechanical seal.
- Dry Running: Excessive heat buildup leading to motor burnout and bearing failure.
Which Water Pumps Need Priming? (The Definitive List)
Understanding your pump type is the first step. Here is the breakdown for Jingong’s core product lines:
| Pump Type | Needs Priming? | Technical Reasoning |
|---|---|---|
| Surface / Centrifugal (Land Pump) | ✅ Always | Suction lift relies entirely on atmospheric pressure pushing water into a void. Air must be evacuated first. |
| Self-Priming Centrifugal | ✅ Initial + After Loss | Contains a built-in priming chamber that holds a water reservoir, but the initial fill is mandatory. |
| Submersible Pumps | ❌ Usually Not | The pump body remains fully submerged. Exceptions apply (see Section 2). |
| Solar Centrifugal (Surface) | ✅ Yes | Mechanically identical to AC centrifugal pumps, complicated by low-voltage DC startup curves. |
| Gasoline / Diesel Pumps | ✅ Yes | Engine vacuum assists flow, but the casing must be manually flooded before ignition. |
Internal Link Suggestion: Explore our Surface Pumps, Submersible Pumps, Solar Pumps, and Fuel Pumps.
Priming Differences Across Jingong’s 4 Core Pump Categories
This section differentiates our guide from generic “how-to” articles. Proper priming varies significantly based on the power source and design of the pump.
1. Submersible Pumps — The Exception to the Rule
Do submersible pumps need priming? Generally, no. Since the entire assembly sits below the water surface, the casing remains flooded.
When Re-Priming is Necessary:
- New Installation: Some large-diameter (4″+) units ship with dry casings. Always verify against the manual.
- Long-Term Shutdown: If disconnected from the discharge pipe for over 3 months.
- Low Water Levels: In shallow wells or ponds, the water level may drop below the intake, introducing air.
- Intake Clogging: A blocked strainer can cause a vortex that sucks air into the intake.
Jingong Pro Tip: On borehole units, ensure the foot valve (non-return valve) on the discharge line is functioning. If it fails, the water column drains back down, requiring a manual “re-fill” of the pipe from the surface—effectively a prime.
Target Keywords: do submersible pumps need priming, how to prime a submersible water pump, submersible pump losing prime solutions
2. Surface / Land Centrifugal Pumps — The “Must Prime” Category

These are your standard jet pumps, centrifugal irons, and garden boosters. Because they sit above the water source, they must pull water upward.
Critical Rules for Surface Pumps:
- Foot Valve is Mandatory: Without a check valve at the bottom of the suction line, water drains back into the source after shutdown, forcing you to re-prime every single start.
- Suction Lift Limit: Realistically limited to 7–8 meters for water at sea level. Higher altitudes or hotter fluids reduce this limit drastically.
- Seal Integrity: Any leak on the suction side (threads, gaskets) will suck air (not water). Use Teflon tape correctly and torque to spec.
Target Keywords: how to prime a surface water pump, how to prime a centrifugal water pump, surface pump priming steps
3. Solar Water Pumps — Patience with Low Voltage
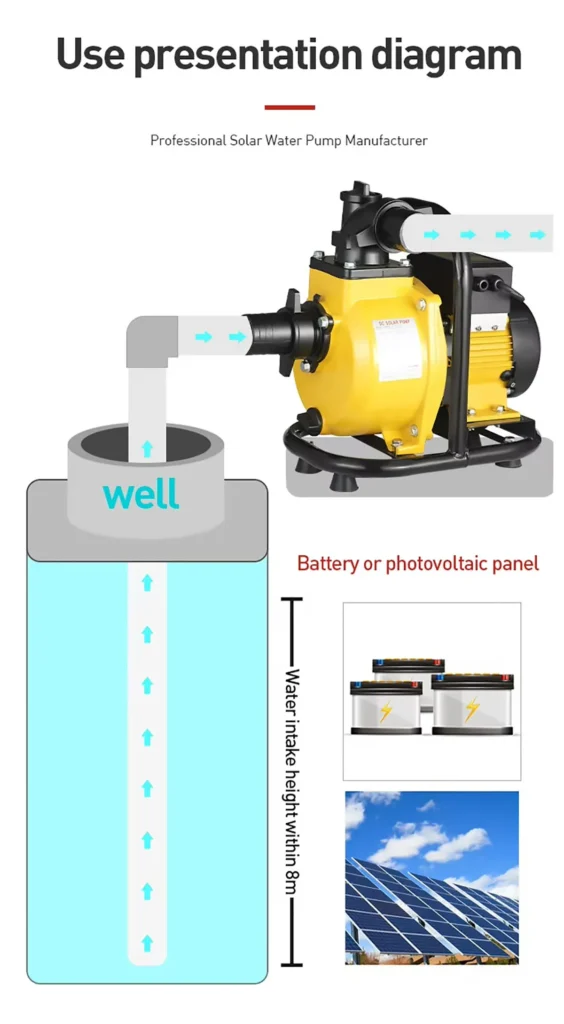
Solar pumps are either submersible (down the well) or surface-mounted (at the wellhead). The surface-mount solar units present unique priming challenges.
The Soft-Start Factor: Unlike AC motors that jump to 50/60Hz instantly, DC controllers perform a “soft start”—ramping up voltage as sunlight intensifies. This means the impeller takes longer to reach full RPM, slowing down air evacuation.
Best Practice: For initial commissioning, prime at midday when irradiance is highest (>800 W/m²). Alternatively, manually fill the casing and close the vent plug before exposing the panels to direct sunlight.
Common Failure Point: Thermal contraction at dusk. As temperatures drop, PVC fittings contract. A “snug” joint in the afternoon becomes an air-leaking joint by midnight, causing the pump to lose prime overnight.
4. Gasoline & Diesel Engine-Driven Pumps — Portable Power
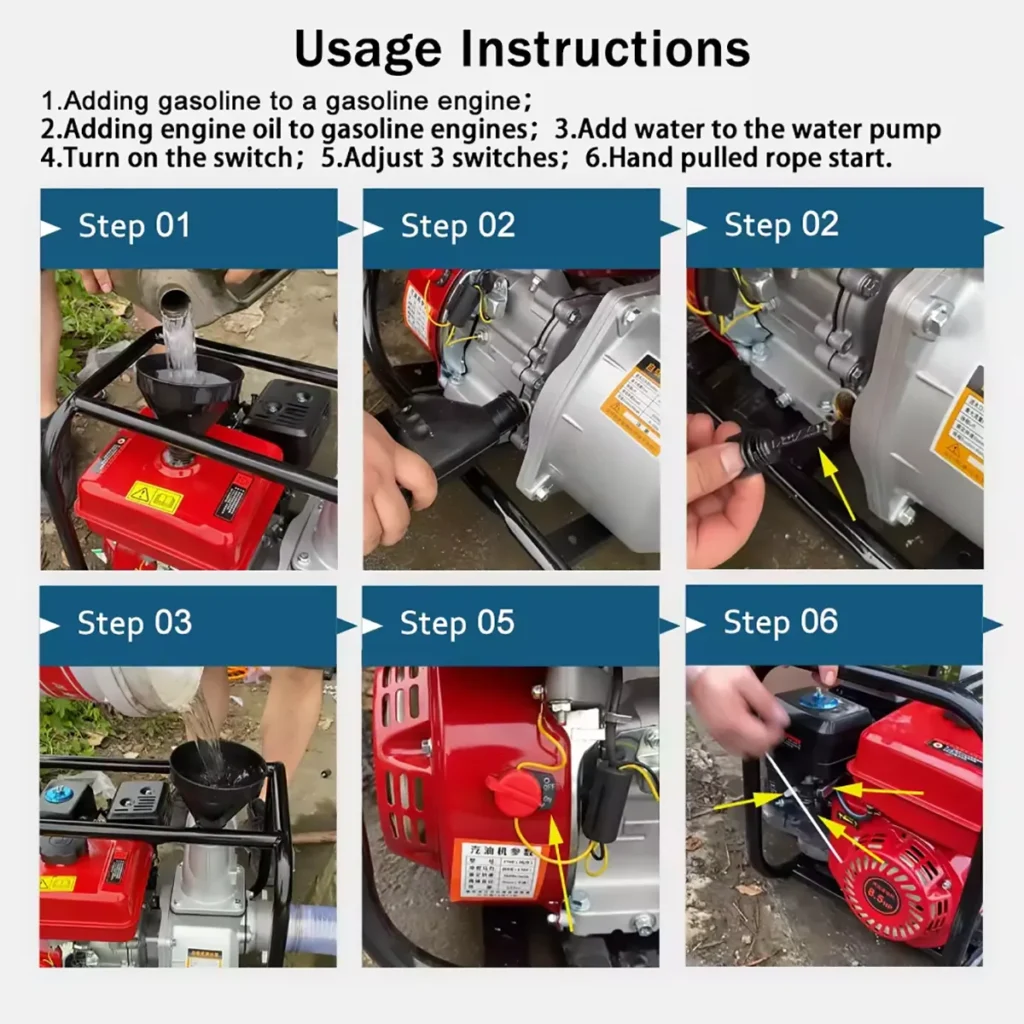
Used for construction dewatering, flood response, and remote irrigation. These units are rugged but unforgiving if primed incorrectly.
The Dual Prime Confusion: Operators often confuse priming the engine with priming the pump. Choking the engine or using the primer bulb prepares the fuel line. It does nothing for the water pump casing.
Fuel Pump Priming Steps:
- Close the discharge valve to minimize backpressure.
- Remove the priming plug on the pump casing (usually on top).
- Fill the casing completely with clean water until it overflows.
- Secure the plug, open the fuel petcock, set the choke, and start the engine.
- Once water discharges steadily, open the discharge valve fully.
Maintenance Note: If pumping silty water (Trash Pumps), always flush the priming chamber with clean water after use. Debris accumulation prevents the pump from sealing properly.
Water Pump Priming Quick Reference Table (Featured Snippet Target)
Use this table as a quick diagnostic tool. It is optimized to appear in Google’s “Position Zero.”
| Pump Type | Manual Prime Required? | Prime Trigger | Key Watch-Out | Maint. Frequency |
|---|---|---|---|---|
| Submersible (AC/DC) | Rare | New install, long shutdown, low level | Cable gland air leak | Annual |
| Surface Centrifugal | Every Start* | Initial + Drain-back | Suction joint air leak | Per use |
| Self-Priming Centrifugal | Initial Only* | Chamber drain-down | Chamber debris | Per use |
| Solar Surface | Yes | Initial + Overnight loss | Foot valve weep + Low V | Weekly (dusty sites) |
| Gas/Diesel Engine | Yes | Every cold start | Fuel vs. Pump confusion | Per use + Flush |
Before You Prime: Prep Checklist (Safety + Tools)
Skipping preparation is responsible for 30% of “pump won’t prime” service calls. Ensure safety and efficiency with this checklist.
Safety Protocols
- Electric Pumps: Perform a Lockout/Tagout on the breaker. Do not rely solely on a switch.
- Solar Pumps: Disconnect PV connectors (use MC4 tools) or cover the panels. DC arc flash is extremely dangerous.
- Fuel Pumps: Turn off the fuel petcock. Allow the engine to cool if recently operated. Maintain a 5-meter no-smoking radius.
- Pressure Release: Slowly crack the priming port to release any residual pressure before removing the cap.
Tools Required
- Funnel: Wide-mouth preferred for dirty site conditions.
- Teflon Tape & Wrenches: For securing suction-side fittings.
- Clear Vinyl Tubing: Acts as a makeshift sight glass on the priming port.
- Clean Water Source: A 5-gallon bucket of clear water. Never prime with muddy or sandy water.
- Leak Detector: A simple solution of dish soap and water to identify air leaks on suction joints.
Equipment Inspection
- Suction Hose: Inspect for cracks, kinks, or collapsed liners.
- Strainer/Foot Valve: Ensure it is clear of debris and the flapper moves freely.
- Discharge Valve: Confirm it is closed prior to starting.
- Pump Casing: Visually inspect for cracks, weeps, or signs of previous freeze damage.
Internal Link Suggestion: Read our comprehensive Pump Installation Guide for more details.
Step-by-Step: Universal Priming Procedure (All Pump Types)
Follow these steps for a successful prime. Notes for specific pump types are included in brackets.
Step 1: Shut Down & Isolate
Turn off all power sources. Electric: Breaker off. Solar: Disconnect PV. Fuel: Fuel off, engine stopped. Wait 30 seconds for capacitors to discharge on single-phase motors.
Step 2: Close Discharge Valve
This reduces backpressure, allowing the water to stay in the casing rather than spraying out prematurely.
Step 3: Open Priming Port / Air Release Valve
Locate the port on top of the casing. [Self-priming pumps: Look for two ports—one on the casing and one on the priming chamber. Open both.]
Step 4: Slowly Pour Clean Water
Add water gradually. Rapid filling traps air pockets. Continue pouring until water overflows steadily from the port with no bubbling—this indicates the air is fully displaced.
Step 5: Secure Ports
Tighten the priming plug(s). Hand-tight plus a quarter-turn with a wrench is usually sufficient. Over-torquing strips plastic threads.
Step 6: Open Suction Line
If you have an isolation valve on the suction line, open it now to allow the water column to rise.
Step 7: Restore Power & Start
Electric: Engage breaker. Solar: Reconnect PV/uncover panels. Fuel: Set choke, open fuel petcock, start engine.
[Solar Note: If irradiance is below 400 W/m², the pump may not reach sufficient RPM to purge remaining air. Wait for stronger sun or manually vent again.]
Step 8: Crack Air Release (Post-Start)
After 10–20 seconds of runtime, slightly loosen the air release valve. Listen for a hiss turning into a steady stream. Retighten immediately.
Step 9: Open Discharge Valve
Slowly open the discharge valve. Monitor the pressure gauge as it climbs to the specified PSI/BAR.
Step 10: Verification
Confirm steady flow, no sputtering, and stable pressure. If the pump makes a rhythmic “chug-chug” noise, air remains trapped—repeat Step 8.
Troubleshooting: When Priming Doesn’t Work (Symptom-Cause-Fix)
This section targets high-volume problem keywords. Bookmark it for future reference.
Symptom 1: “I primed it, but there is still no water.”
- Cause A: Suction Line Leak. Air is being sucked in through a faulty joint. Fix: Apply soapy water to all suction joints; look for bubbles. Re-tape threads.
- Cause B: Foot Valve Failure. Stuck closed or missing entirely. Fix: Retrieve the foot valve and free the flapper or install a new one.
- Cause C: Excessive Suction Lift. The pump is too far from the water source. Fix: Relocate the pump closer to the water or switch to a submersible model.
- Cause D: Damaged Impeller. Previous dry-run damage. Fix: Inspect and replace the impeller.
Symptom 2: “Water flows, but it sputters or surges.”
- Cause: Residual air in the casing or a partially clogged strainer. Fix: Re-vent the air release valve (Step 8). Clean the suction strainer.
- Solar Specific: Low irradiance combined with a large air pocket. Fix: Wait for peak sun hours or manually vent the pump.
Symptom 3: “Pump keeps losing prime overnight.”
- Cause: A weeping foot valve (most common) or a hairline crack in the suction hose above the water line. Fix: Replace the foot valve. Inspect and replace the suction hose.
- Solar Specific: Thermal contraction loosening PVC unions at dusk. Fix: Re-tighten all above-water joints.
Symptom 4: “Pump is noisy after priming (Rattling/Grinding).”
- Cause: Cavitation due to incomplete priming or a blocked inlet. Fix: Shut down immediately. Re-prime fully. If noise persists, check for bearing damage or debris in the impeller.
Symptom 5: “Solar pump shows ‘Run’ but no flow after priming.”
- Cause: PV voltage below the pump’s start threshold (dawn/dusk/clouds). Fix: Verify panel orientation and wait for adequate sunlight. Check controller parameters.
Symptom 6: “Fuel pump engine runs, but pump won’t draw.”
- Cause: Casing not filled (operator primed the carburetor but forgot the pump casing). Fix: Fill the pump casing with water.
- Cause: Internal debris in priming chamber. Fix: Disassemble and flush the chamber.
Internal Link Suggestion: Visit our Pump Troubleshooting Hub for more diagnostic charts.
Priming by Scenario (Real-World Application Guides)
Domestic Well / Home Booster
For homeowners, the foot valve is critical. Without it, every power outage drains the system. When priming, ensure the pressure tank pre-charge is set correctly (typically 2-3 PSI below the cut-in pressure). Always prime the pump before closing the tank isolator valve.
Farm Irrigation (Surface or Solar)
On solar farms, always commission the system at midday. Label the foot valve location clearly for seasonal restarts. For fuel pumps on remote fields, dedicate a 5L jerry can of clean water specifically for priming—never use canal water, as silt will clog the casing and seals.
Construction Site Dewatering (Fuel Pump)
Prime the pump before lowering it into the pit. If lowered dry into silty water, it will suck debris immediately. Post-job, always flush the casing with clean water. Store the pump with the priming port open to allow internal drying, preventing seal swelling during storage.
Off-Grid Solar / Remote Village Supply
Account for seasonal water table fluctuations. During the dry season, submersibles may need lowering, requiring a re-prime check. For community-managed sites, paint “PRIME HERE” and “FOOT VALVE BELOW” on the casing in the local language and English to reduce unnecessary warranty calls.
Long-Term Shutdown Restart
Never assume the system held its prime. Drain and re-prime the system. Check the mechanical seal condition—sitting dry for 6+ months can stiffen seals. For solar controllers, consider resetting parameters if firmware settings have drifted.
After Priming: Maintenance to Prevent Prime Loss
Priming is not a one-time event for most surface units. Follow this schedule to ensure longevity:
- Monthly: Inspect suction joints for weep marks. Re-torque fittings as necessary.
- Per Season: Inspect the foot valve. Listen for backflow sounds when the pump shuts off.
- After Any Disconnect: Always re-prime. Never assume the system will hold its charge.
- Solar Specific: After dust storms or prolonged cloudy periods, re-check the foot valve. Thermal cycles loosen unions over time.
- Fuel Pump Specific: Always flush the priming chamber post-job. Grease throttle linkages before storage.
Jingong Engineering Insight: In high-temperature export markets (Middle East, North Africa), we upgraded our priming port O-rings from standard NBR to Viton in 2024. NBR tends to harden after 12–18 months, allowing microscopic air leaks. This small specification change reduced related warranty claims by approximately 40%. This is the level of detail a specialist manufacturer provides.
Frequently Asked Questions (FAQ)
1. Do all water pumps need priming?
No. Submersible pumps generally do not require priming because they remain submerged underwater. However, surface/centrifugal pumps, self-priming pumps (after chamber drain), solar surface pumps, and engine-driven pumps all require manual priming. Refer to the Quick Reference Table in Section 3 for specifics.
2. Can you prime a submersible pump?
While submersibles are designed to be self-priming via submersion, you may need to intervene if the water level drops below the intake, after long-term storage, or if the foot valve fails to hold the water column. In these cases, ensuring the discharge pipe is full of water effectively “primes” the system.
3. How often should you prime a water pump?
It depends on the type. Surface pumps typically require priming every start unless a functional foot valve is installed. Self-priming pumps only need priming if the internal chamber drains. Submersibles rarely need priming. Solar surface pumps in harsh environments may need weekly checks.
4. Is it bad to run a water pump without priming?
Yes, it is detrimental. Dry running leads to cavitation, which destroys the impeller and mechanical seal. It also causes the motor to overheat, potentially burning out the windings within minutes. This is a leading cause of premature pump failure.
5. Why does my solar pump lose prime overnight?
The most common reason is a weeping foot valve combined with thermal contraction. As temperatures drop at night, PVC fittings contract, and any minor suction leak expands into a full prime loss by morning. Additionally, the daily PV cycle (stopping/starting) exposes any minor leaks.
6. What’s the difference between priming a gas pump and an electric one?
With a gasoline or diesel pump, you must prime two separate systems: the engine fuel line (using the primer bulb/choke) AND the pump casing (filling it with water). With electric or solar pumps, you only need to prime the pump casing itself.
Jingong Tech: Why This Guide Comes From a Pump Manufacturer, Not a Blogger
Most “how to prime a water pump” articles are written by general content marketers. This guide is produced by Jingong Technology (Zhejiang), a specialized manufacturer with 15+ years of R&D and export experience.
We produce a full spectrum of pumping solutions:
- Surface / Land Centrifugal Pumps: For agricultural and domestic boosting.
- Submersible Pumps: 4″–10″ borehole, sewage, and drainage models.
- Solar Pumping Systems: Integrated DC controllers, helical, and centrifugal solar units.
- Gasoline & Diesel Engine Pumps: For construction, irrigation, and emergency services.
Our R&D team actively tracks warranty returns, conducts field visits, and collects installer feedback globally (Southeast Asia, Middle East, Africa, South America, Europe). The failure modes and technical insights shared in this guide are derived from real-world data, not copied from other blogs. As a Water Pump Supplier, we believe informed customers lead to better installations and longer-lasting equipment.
Need the Right Pump for Your Priming Scenario?
Selecting the right pump architecture simplifies operation and maintenance. Let our expertise guide your decision:
- Zero Priming Hassle? → Opt for a Submersible Pump (AC or Solar). Install it and forget it.
- High Surface Pressure? → Choose a Self-Priming Centrifugal Pump with a robust foot valve.
- Off-Grid Locations? → Investigate our Solar Surface or Submersible Pumps.
- Remote Sites / High Debris? → Select a Gas/Diesel Trash Pump.
OEM/ODM Services Available: We offer custom sizing, voltage configurations (50Hz/60Hz), and private labeling for international distributors.